



HomeAbout MeResumeI like to read blogsEmail Me
Showing posts with label Food. Show all posts

Thursday, May 09, 2013

REVIEW – MASHA

I was very excited to have the chance to review and test run the MASHA.

IMG_6125

First thing that excited me was the information that came in the call out email

The easy-to-operate Masha can create restaurant-quality mash
with a perfect consistency and no lumps, all in just seconds.
Unlike conventional cutting blades that over-process
and rupture the starch grains in potato producing glue like mash,
the Masha’s innovative design works to create the best mash every time.
The Masha uses patented Rotor Cone technology,
which allows the motor to gently squeeze potato through the outer mesh
at a safe, low speed.
As the Masha has no blade it is safe for the whole family.
A quick-release rotor makes the product easy to clean,
while its compact design allows for easy storage.
Masha is also safe for dishwashers and friendly on non-stick pots.
RRP$59.95 www.prepstore.com.au

IMG_6126

Just the way they talked about the science of mashing potato,
The fact it was meant to be safe for anyone in the family to use,
And the Pièce de résistance… dishwasher safe!

IMG_6130

And you know what?
We found all that to be true!!!
Dave is our go-to-Man for mashing
So he gave it a whirl on some potatoes first.
PERFECTLY CREAMY SMOOTH!
Next up was swede and carrot (I love love love this mash!)
Now swede is a rather hard veggie to mash
and the Masha was given a run for it’s money on this one!
It didn’t like it much and while it was mashed better than a “manual masher”
There were still lumps of swede that the Masha didn’t mash.
So next up I thought I would see how the Masha would cope
with being the helping hand with Walnut and Banana bread.
And I was pleasantly surprised!

WALNUT AND BANANA BREAD
Ingredients
1 3/4 cup self-raising flour
1/4 cup plain flour
1 tsp ground cinnamon
2/3 cup brown sugar
1/2 cup milk
2 eggs
50g melted butter (cooled)
2 ripe to overripe bananas
1/2 cup walnuts

First step was to crush the walnuts

MashaBananaWalnutBread1

Our chef-of-the-day found that easy peasy!

MashaBananaWalnutBread2

In a large mixing bowl sift all the dry ingredients

MashaBananaWalnutBread3

Add the nuts and wet ingredients.

MashaBananaWalnutBread4

I don’t mash our banana, I just break it up, because I find that the mixing process mashes it.

MashaBananaWalnutBread5

Then using the Masha we just “mashed” it for a few seconds,
Moving the Masha up and down as we went.

MashaBananaWalnutBread6

Once the mix was combined we poured it into a lined loaf tin.

MashaBananaWalnutBread7

Then baked in a preheated oven at 180c for 45-50 minutes.

MashaBananaWalnutBread8

Once it was cooked and cooled for a little while we simply sliced and added a  little butter

MashaBananaWalnutBread9

And the last step was the best…
EAT!

Disclosure: This is not a paid sponsored post.
I received a MASHA, for review purposes, and all opinions expressed are purely my own


Photobucket

Pin It Now!

Wednesday, April 17, 2013

TARGET BLOGGER AMBASSADOR POST – AUTUMN WARMERS

The cooler weather is definitely upon us.
The leaves are changing colour.
The days are shorter.
There is dew on the lawn in the morning.
And it’s time to get warm at night.
So with a little shopping at Target
I found a couple of things to warm us up.
Our girls love to get up early on the weekend.
Saturday morning television always means getting up early,
Finding a place on the couch
And snuggling down under a throw rug.
Target have a lovely range of throw rugs
And we just had to purchase a warm red one
Perfect for them in the mornings and me in the evening!
TargetThrowRug
Below Cost
If you asked me if I liked shopping
You would probably see me grimace.
But I think that I have finally found my happy place in the shopping aisles….
Crockery!
Oh my!
*insert Angels singing*
I could enter this aisle every week and come home with some new deliciousness made of china!
So when I found these gorgeous Vintage Bowl and Side Plate I knew that it would be perfect.
P.E.R.F.E.C.T
For some yummy pumpkin soup
I WAS RIGHT
TargetVintageBowl&Plate
And my perfect pumpkin soup recipe??
Well this is what I do:
Cut up a whole pumpkin into chunks that are roughly 2cm cubes
(Jap pumpkins are the best tasting for soup)
I cook half of it with the skin on and use these bits for salad
(simple salad of lettuce, pumpkin and some feta DELICIOUS)
But I digress…
Back to the soup…
Place cut pumpkin on a baking tray.
Add a clove or 3 of garlic (or a teaspoon of crushed garlic)
And a teaspoon of honey.
Bake in a preheated oven at 200c
(I turn our old/stupid slow oven to the highest temp)
Cook till the pumpkin is soft
(or starting to blacken on the ends THESE BITS ARE YUMMY!)
Allow to cool
I then blend this in small batches
With 1 litre of chicken stock.
The soup is then ready to cook.
It makes a yummy thick soup.
If you wanted it runnier
Add more stock!
For another variation add a teaspoon of coconut oil when you bake the pumpkin.
And for a slow cooker version
Throw the pumpkin, stock and crushed garlic in the slow cooker.
Cook on low for 6-8 hours then blend.
EASY!
Disclosure: This is a paid sponsored post. I also receive vouchers to spend on items, for review purposes.
For this post I purchased a Throw Rug, 2 vintage bowls and a vintage side plate.
All words and opinions expressed are purely my own.


Photobucket
Pin It Now!

Monday, February 11, 2013

Target Blogger Ambassador Post – Valentines Day

We don’t get out much (yeah yeah I hear you say lol)
So for a romantic twist we sometimes “eat-out at home”.
So when the girls are fed and in bed
Dave will set up a white plastic trestle table
in the middle of the lounge room.
We will pop on a movie and eat at the “White Table Restaurant”.
With Valentine’s Day coming up this week
And, this, my first Target Blogger Ambassador needing a theme,
I thought I would share some ideas to make your Valentine’s Day a little sweeter!
I purchased some of these gorgeous short drink glasses.
I love that they are “durable for everyday use” and “dishwasher safe”
Two great things for a romantic evening!

TargetShortDrinkGlasses

Now if you know Dave you would know he has a thing for sweet things!
He is the Dessert King in our house.
Everyone knows the way to a Man’s heart is through his stomach
Well I like to think that the way to my Man’s heart is through his sweet tooth!
So my focus, for our romantic “White Table Restaurant” evening is dessert!
I decided to use the Short Drink Glasses to serve the dessert in,
because they are the ideal size and shape for serving up some yumminess!
First off I thought of Chocolate Mousse.
For Christmas I bought Dave a huge tub of powdered mousse mix.
We use this mousse mix in the school canteen
because it 1. tastes great and 2. you just add water (making it quick, easy and low fat!).
I’ve served the mousse with a Terry's Chocolate Orange segment,
that was grated over the top (for a Orange Jaffa twist!)

If Avocados weren’t so expensive right now I would have tried out this recipe (found at The Healthy Chef)

Really Good Chocolate mousse

1/4 cup honey
2 ripe avocadoes
1 teaspoon vanilla extract or 1/2 teaspoon vanilla bean paste
1/4 cup good quality dark cocoa powder

Combine all the ingredients in a good powerful high speed blender like a Vitamix
adding the honey first, followed by the avocado, vanilla and cocoa.
Blend for about 30 seconds until smooth and creamy.
Spoon into a bowl and allow to set in the fridge.
The addition of banana or a little water makes for a lighter mousse.

The second dessert was a quick and easy cheesecake mix
I crumbled a Milk Arrowroot biscuit into the glass
Then topped it with my cream cheese mix (see recipe below photo)
Added a layer of fresh peach (peeled and finely sliced)
And then repeated the layers to fill the glass.
It definitely could have done with something sweet,
like a coulis or sweetened whipped cream
because it was a little on the “could have been sweeter” side

Cream Cheese Mix:
250g Light Cream Cheese
1 Lime
2 Tablespoons Honey

Mix the cream cheese and honey with the juice and zest from the lime until creamy.
This mix is enough to make 2-3 glasses.

The final dessert I want to share is another super simple one.
Blue Berry Meringue
I’ve used premade little meringues.
Crumble 3 or 4 into the glass, top with some whipped cream and blue berries,
repeat the layers and top with some whole meringues

And when dessert is finished
Why not use one of the glasses for a latte
Seen here served on one of the gorgeous Shebelle Square plates (perfect size for serving the glasses!)

Or if coffee doesn’t take your fancy
Why not try a hot chocolate served in a Red Heart Mug (only available at Target)

and with Valentine’s Day comes presents.
I like presents!
I like presents that have a purpose.
And a good present with a purpose for Valentine’s day??
PILLOWS!!

TargetPillows

Yes, we bought some new pillows.
Because we all know a good nights sleep is essential for a good relationship!
What’s been your favourite Valentine’s Day present?
What’s your favourite dessert?
Or, if your not a dessert person, what’s your favourite thing, to eat, for a romantic meal?

Disclosure: This is a paid sponsored post. I also receive vouchers to spend on items, for review purposes.
For this post I purchased 1 box of 6 Short Drink Glasses, 2 Red Heart Mugs,
2 Shebelle Square plates and 4 Target Essentials Pillows.
All other items are my own.
All words and opinions expressed are purely my own

Photobucket

Pin It Now!

Saturday, February 02, 2013

Banana Bread

Today I baked

BananaBreadBefore1

Used my favourite, easy peasy, tried and true recipe (found HERE)

  • Melted low-fat dairy spread, to grease
  • 265g (1 3/4 cups) self-raising flour
  • 40g (1/4 cup) plain flour
  • 1 tsp ground cinnamon
  • 140g (2/3 cup, firmly packed) brown sugar

  • 125ml (1/2 cup) skim milk
  • 2 eggs, lightly whisked
  • 50g butter, melted, cooled
  • 2 overripe medium bananas, mashed

Step 1

Preheat oven to 180°C.
Brush an 11 x 21cm (base measurement) loaf pan with melted dairy spread to lightly grease.
Line the base and 2 opposite sides with non-stick baking paper, allowing it to overhang.

Step 2

Sift the combined flours and cinnamon into a large bowl.
Stir in the sugar and make a well in the centre.
Place the milk, eggs, melted butter and banana in a medium bowl, and stir until well combined.
Add the banana mixture to the flour mixture and stir until just combined.
Spoon the mixture into the prepared pan and smooth the surface.

Step 3

Bake in preheated oven for 45-50 minutes or until a skewer inserted into the centre comes out clean.
Remove from oven and set aside in the pan for 5 minutes.
Turn onto a wire rack to cool completely.
Cut into slices to serve.

BananaBreadAfter1

I also, while the oven was hot, made some choc chip cookies.
Almost all ready for back to school next week!
What’s your favourite thing to bake?
Photobucket

Pin It Now!

Monday, November 05, 2012

Review: Well Naturally Milk Chocolate

Now we all know that chocolate doesn’t always mean chocolate, don’t we?
There is chocolate that leaves you wishing you’d never put it in your mouth.
There is chocolate that makes you wonder why it is called chocolate
And there is chocolate that makes you go mmmmmm.
Dave’s Mum will totally be nodding right now and wondering where she has hidden some chocolate away.
She is a chocoholic! She loves chocolate.
And guess what?
It’s a genetic fault (fault?? defect?? or should that be perfection?)
Either way it’s genetic.
Dave has a sweet tooth
And the girls do too!
So when Sarah, from Wordstorm, wrote and asked if we’d like to try some “Well, Naturally Milk Chocolate”…
Yep there would have been bloodshed if I had said no and because it would have been my blood I had to say  YES!

IMG_3122

So I bet the first thing you saw was the no added sugar?
Am I right?
Well, don’t let that fool you into thinking this chocolate isn’t any good, because it is!!
We all had a bit of the Creamy Milk and we all thought it was as chocolaty as chocolate should be!
The girls all loved it and Dave must have liked it because he was happy to sample the Fruit and Nut too!
For me, the critic with the ability to write on the blog, my taste buds went mmm but…
The only downside, that I could find, was that it didn’t leave me with that “yay I’ve had chocolate” feeling.
Now I’m not a chocoholic like the others in this house
but there are times (usually just before school pick up) where I really feel like chocolate
Just one piece will usually satisfy that  urge (and yes I can stop at one piece)
But with “Well, Naturally” I didn’t get that satisfaction feeling.
So why am I telling you this?
Well, I think that I didn’t get that feeling because I didn’t get the artificial sugar hit that I would from another chocolate brand.
”Well, Naturally” have 80% less sugar than regular chocolate bars
and have no added sugar you know that the sugar in the bar is meant to be in the bar!
and that’s got to be good, right?!

Available in the health food aisle of Woolworths, RRP $2.69
www.vitalitybrands.com/well-naturally

Disclosure: This is not a paid sponsored post. I received 6 complimentary Well Naturally Milk Chocolate Bars, for review purposes, and all opinions expressed are purely my own.

Pin It Now!

Sunday, November 04, 2012

Review: The Collective Yoghurt

I was super excited to read an email from the lovely Tammi, at WordStorm, and be able to review some “The Collective” yoghurt.
We love yoghurt in our house and I was curious to find out if this one would pass the taste test.
I hadn’t heard of The Collective brand before, have you?
It’s a New Zealand brand/product and it’s catch line is “No Bull”.
”probiotic, vegetarian, gluten-free, gelatine-free, preservative-free and handcrafted. No Bull”
The first thing I noticed were the very cool graphics with awesome colours.
And the girls were very eager to try the yoghurt drinks!

IMG_2840

I mean how cool are they?
Who wouldn’t want to try them?

IMG_2835

and the great thing about them, apart from being yummy AND good for you?
You can use them on busy nights, when the Mummy Taxi is running to and fro
And drink them in the car instead of having dessert, warning though… they are filling.
No fuss, no spills just lots of “these are yummy”

IMG_2850

The next thing we tried were the Gourmet Probiotic Yoghurts.
I just love the choices in flavours
AND they all got the tick from our little taste testers.
The favourite was the apple crumble, with the crumbly bits it was hard to not top the yoghurt-y list!
The just-right-sized chunks of fruit through the yoghurt you knew you were going to have something real and something delicious.

IMG_2841

and the last to be trialed were the skinny Greek yoghurt tubs.
Now don’t let the 1% fool you!
Yeah I know what you are thinking.
No fat, no flavour!
Well, these left that theory at the door!
THEY WERE YUMMY!
They were thick and they all as Greek Yoghurt should be.

IMG_2842

We all really enjoyed trialing these products and they get a huge thumbs up from us.
With a huge range of flavours, in an amazing array of products, there is sure to be something to suit all manner of taste buds.
I do wish they were Australian made but if I think of New Zealand as our cousin then I think I can overlook this,
because boy oh boy these yoghurts are good! NO BULL!

www.thecollectivedairy.com/nz / Available from select Australian independent grocers

Disclosure: This is not a paid sponsored post. I received complimentary The Collective Yoghurt products, for review purposes, and all opinions expressed are purely my own.
PS They make cheese too!!!

Pin It Now!

Thursday, August 09, 2012

Satay Beef With FreeNut Butter

As promised, in this post about FreeNut Butter,
I cooked some satay using the FreeNut Butter

SatayFreeNut

It was a success, delicious and surprisingly satay-y!!
I used my quick satay recipe and replaced the peanut butter with the FreeNut Butter.
I browned 600g beef strips
removed from the wok and then added about a teaspoon crushed garlic and half a teaspoon of chopped chilli
then tossed in  my vegetables (we used carrot, asparagus, broccolini and spring onion)
I then added 2 tablespoons of Freenut butter, 2 tablespoons oyster sauce and half a tablespoon of soy sauce.
Returned the beef to the wok, with all the lovely juices, and stirred through until the sauce looked glossy like the photo.
Was creamy, just like a satay, but, of course, it didn’t taste of peanuts but because I used the crunchy Freenut
every now and then you would get one of the roasted sunflower seeds and the flavour would just pop in your mouth
YUM!
and a great alternative to peanut satay!

Pin It Now!

Sunday, June 10, 2012

Still Worth A Kings Ransom

I made this on Wednesday night

IMG_0503

and it was so yummy I just had to share the recipe

600g beef strips
1 bunch broccolini, cut stalks to bite size
1 handful of green beans (probably about 20-30), topped and tailed (as we call it, when you trim the ends)
1 or 2 spring onions, diced
1/2 teaspoon crushed garlic
2 Tablespoons peanut oil
4 Tablespoons Oyster Sauce

Bring a small pot of water to boil. Place broccolini and beans in the boiling water.
Remove from the stove top and allow to sit.
Heat oil in wok. Add garlic, toss through spring onion.
When the onion has started to collapse add beef strips and stir until brown.
Toss through drained broccolini and beans.
Add Oyster Sauce and cook for another 5 minutes.
If the sauce is runny try thickening with a little corn flour mixed with water.
Serve with rice.

Simple and simply yum!
You could also add some other veggies (we just used what we had in the fridge)
or some chilli, sesame seeds or basil

Pin It Now!

Sunday, May 20, 2012

Stacking Up The Vegetables

Recently I was lucky enough to receive a pack from Gourmet Garden 

GourmetGarden

and with the busy week we have just had I finally found time tonight to use some of them
The first thing I noticed was the great packaging, that you can see the yumminess inside the tubes.
The second thing was that each tube told you how many ‘real’ fresh ingredients were in the tube
Eg: the 115g tube of chillies contained 5 chillies .
and the other thing I noticed was the amazing aroma that escaped when you peeled back the foil lids!
Inspired I decided to cook two dishes to share with you
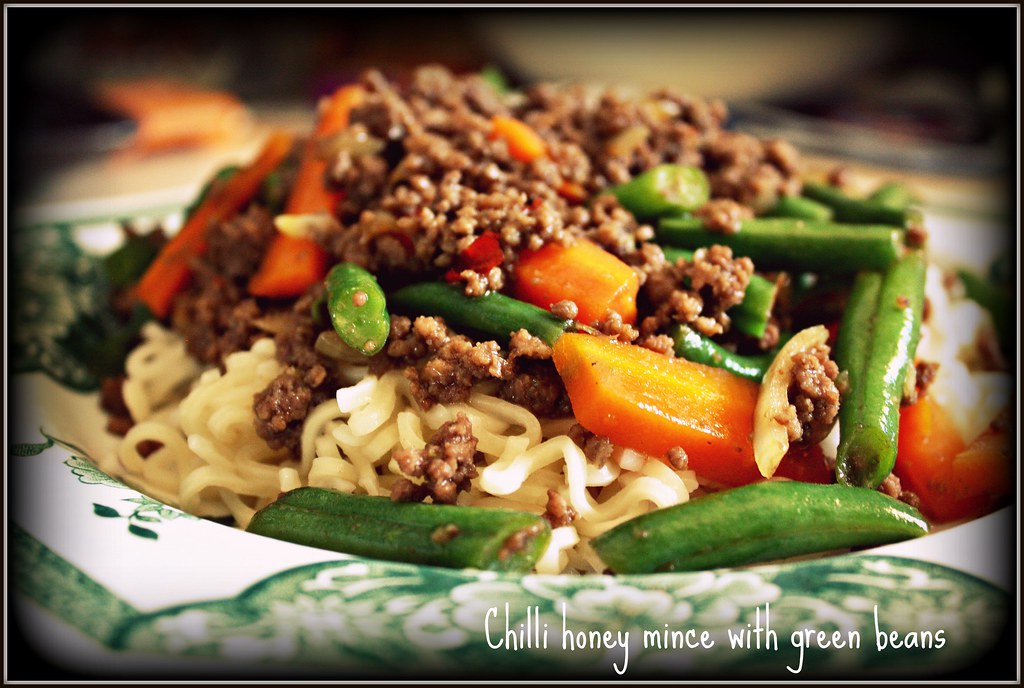
the first was a modified Chilli Honey Mince with Beans
This one is a new family favourite and is great because I use whatever mince and vegetables I have on hand,
so this time we had lamb mince and loads of vegies

GourmetGarden#1

Ingredients

Peanut oil
500g lamb mince
1 onion, chopped
1 Tablespoon Gourmet Garden chunky garlic
1/2 tablespoon Gourmet Garden hot chilli paste 
2 carrots, diced
200g green beans, chopped
1/4 cabbage, shredded
1 small zucchini, diced
2 tablespoons oyster sauce
1/4 cup honey
Instant Noodles

I started by chopping up all the vegies

GourmetGarden#2

Want a tip for cutting onion??
Get someone else to chop it for you!
I am such a sook when it comes to cutting onions, truly sad!!!!

Once the oil had heated in the wok I cooked the mince

GourmetGarden#4

Once it was brown I removed it from the wok and put it aside in a bowl.
Then I fried the onion, garlic, chilli, carrot, cabbage, zucchini and green beans in same heated, oiled wok until just tender.

GourmetGarden#6


Returned beef to wok and cooked until hot.

GourmetGarden#8

Stir in sauce and honey.

To cook noodles, I used 4 “blocks” of noodles (what do you call them??)
to feed the 7 mouths that were at our dinner table tonight (Grandma is here tonight. HOORAY)

GourmetGarden#9

Serve mince on a bed of noodles

GourmetGarden#10

The other thing I decided to try was some Thai mushrooms

GourmetGarden#3

I simply cut up my mushrooms, I think there were 9 or 10

GourmetGarden#5

then fried them off in some olive oil

GourmetGarden#7

when they had softened I squirted in about 1and a half tablespoons of the Gourmet Garden Thai Seasoning
I served these with the mince

GourmetGarden#11

So some things to note…

I thought the HOT chilli paste might have been hotter than the chilli we normally use, hence me using a little less than normal.
However the amount I used wasn’t hot at all.
You didn’t get a chilli bang at all and the only hint was when you had finished eating and then you noticed a slight tingle on your lips.

I wasn’t sure how the Thai would go with the mushrooms.
I don’t like Mushrooms.
But everyone else does.
So my Mushroom lovers were my taste testers and all but one gave it big thumbs up!!!
And I have to say that cooking this one made me salivate because the smell was amazing!

I so wish I had more time for baking/cooking this week
I had plans in my head of making some herb scones with the basil or thyme that I was sent.
I also wanted to make a pumpkin and feta salad with the coriander
But sadly it didn’t happen but I’m glad I’ve been able to share these two recipes with you as part of the

Disclosure: This is not a paid sponsored post. I received complimentary pack of Gourmet Garden products, for review purposes, and all opinions expressed are purely my own.

Pin It Now!

Wednesday, January 18, 2012

On An Island In The Sun

Tonight we had this for dinner

it was delicious
as was the sunshine we had this afternoon

What did you have for dinner? Was it delicious?

Pin It Now!